

How to Install Rural Culverts for Lasting Access
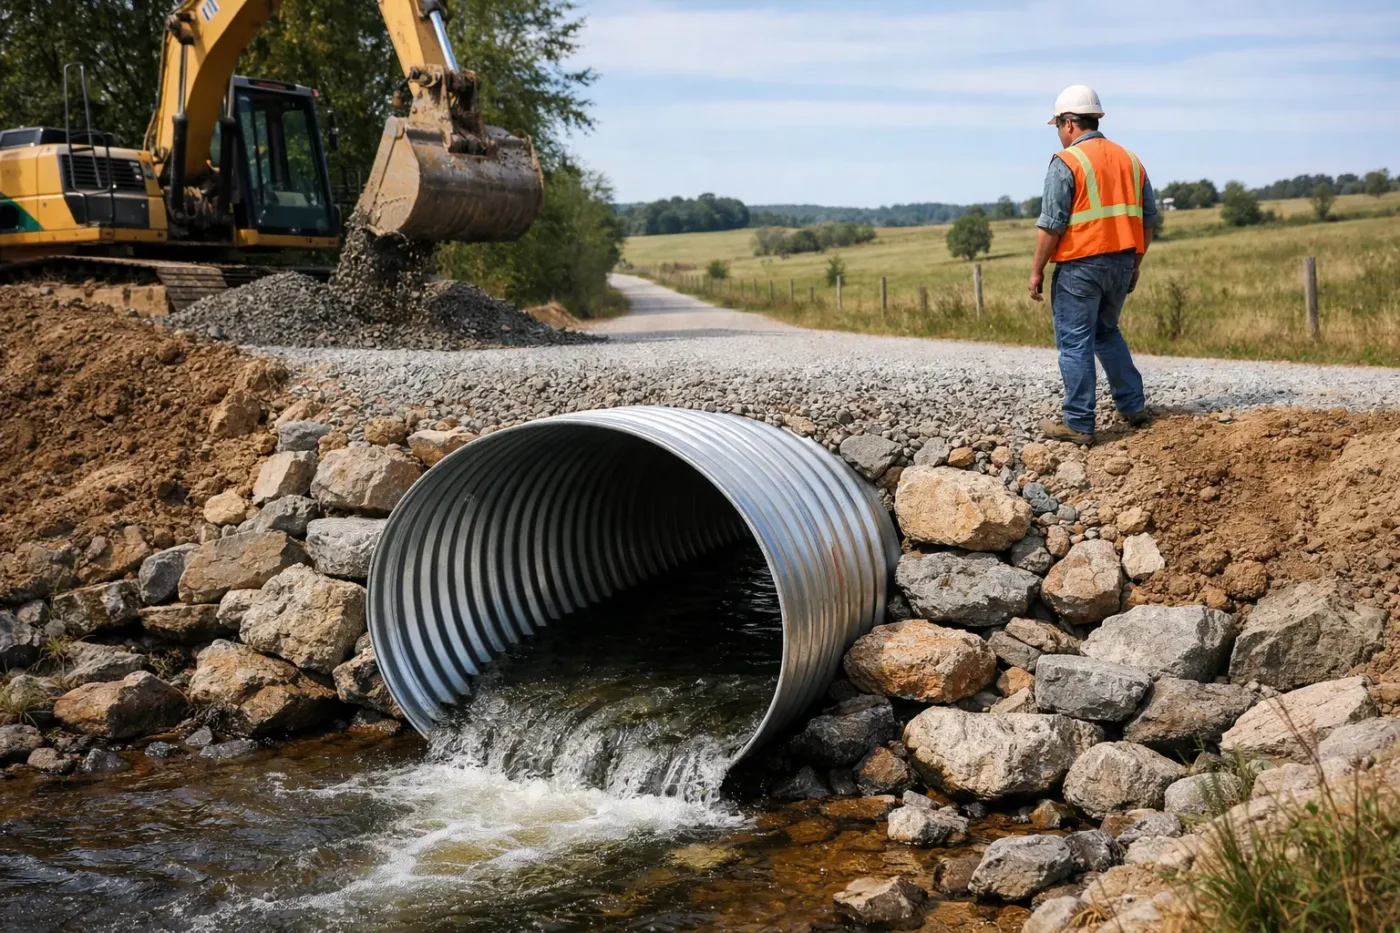
A washed-out crossing or boggy driveway can stop a farm day before it starts. Water that cannot pass cleanly beneath a road will find another path – often through the road base, around a headwall or across a paddock gate. Knowing how to install rural culverts properly means building an access track that stays usable through heavy rain, stock movements and regular machinery traffic.
A culvert is not simply a pipe dropped into a trench. Its performance depends on catchment flow, pipe size, fall, bedding, compaction and protection at both ends. Get those details right at the start and the job is far less likely to need costly repairs after the next major downpour.
Start with water, not the driveway
Before selecting a pipe, look at where the water comes from and where it needs to go. Walk the line after rain if possible. Check the natural drainage path, upstream gullies, dam overflow routes, table drains and any signs of previous scouring. A low point in a track is not automatically the right place for a culvert if it changes the natural flow and directs water towards a shed, neighbour or fence line.
The size of the catchment matters. A small pipe may handle ordinary runoff but block or overtop in a large storm, particularly where leaf litter, sticks and washed-down debris are common. On the other hand, installing an oversized pipe without proper inlet and outlet work can still lead to erosion around the crossing.
For a driveway crossing, consider what will use it. A light ute, livestock trailer, loaded tractor, fertiliser truck and heavy machinery transporter place very different loads on the pipe and road surface. Pipe material, cover depth and road construction must suit the heaviest realistic vehicle, not just everyday traffic.
Where works affect a creek, defined watercourse, flood-prone land or council-managed drain, approvals may be required. Check requirements with the relevant council or authority before starting. This is especially important where changing flow could affect downstream land, aquatic habitat or public infrastructure.
How to install rural culverts: set the right line and level
The pipe should follow the natural direction of water flow, rather than sitting square across the driveway simply because that is easier to mark out. In most situations, setting it on the same grade as the existing channel helps water enter and leave without backing up or cutting around the ends.
Use a laser level or reliable site levels to establish the invert – the inside bottom of the pipe – at both ends. The culvert needs enough fall to move water and sediment, but not so much fall that the outlet scours badly. The exact grade depends on site conditions, pipe diameter and soil type. Flat country may need carefully formed drains to guide water into the inlet, while steep country often needs more outlet protection.
Allow enough length for the full width of the road formation, including batters. A pipe that finishes at the edge of the wheel tracks is exposed to damage and allows water to undermine the shoulders. Extend it beyond the finished road edges so the inlet and outlet sit clear of the formed driveway.
Mark the crossing before excavation and check for underground services. On rural properties this can include power, water lines, irrigation, communications and old drainage. Do not assume a service is absent because the area looks undeveloped.
Excavate a stable trench and prepare the bedding
Excavate the trench wide enough to place and compact bedding around the lower section of the pipe. The trench base should be firm, trimmed to grade and free from soft pockets, roots and loose organic material. If the base is wet, pumped-up or unstable, remove unsuitable material and rebuild it with an appropriate engineered fill or crushed rock layer.
Bedding gives the culvert even support. Without it, a pipe can settle unevenly, crack, separate at joints or develop low spots that hold debris. For many rural driveway installations, well-graded granular material is used and compacted to form a uniform cradle. The required bedding type and depth will vary with the pipe product, soil conditions and vehicle load, so follow the manufacturer’s specifications and any engineering requirements.
Place the pipe carefully without dragging it through the trench or knocking the ends out of line. Check levels again once it is seated. With multiple pipe lengths, make sure joints are properly connected and sealed where required. Water entering through poor joints can wash out surrounding fill over time, even when the road surface initially looks sound.
Backfill in layers, not one big push
Backfilling is where many culvert jobs either become durable or start failing. Place selected material evenly along both sides of the pipe in thin layers, then compact each layer. Build the sides up together to avoid pushing the pipe out of alignment.
Do not drop large rock straight onto the pipe, and do not rely on a few passes from a machine to compact deep fill. Material placed too quickly can bridge over voids, leaving weak areas beside or above the pipe. Those voids can later collapse under truck loads or allow water to travel through the road formation.
Once the pipe is supported along its sides, continue placing compacted layers over the top until the required cover depth is achieved. The amount of cover needed depends on pipe class, diameter, material and loading. This is a point where cutting corners is expensive: insufficient cover leaves the pipe vulnerable to crushing, deformation and damage from grading work.
Build the final driveway with a shaped, compacted surface that sheds water. A road that is flat or dished in the middle will hold water, soften the base and direct runoff towards the culvert trench. Maintain a suitable crown or crossfall, with table drains where needed to carry runoff to the crossing rather than letting it sheet across the road.
Protect the inlet, outlet and surrounding ground
A culvert can be structurally sound and still fail because water cuts around it. The inlet needs a clear approach so water reaches the pipe rather than ponding against the road. The outlet needs protection where fast-moving water could scour soil from beneath the pipe.
Depending on the site, protection may include rock armouring, geotextile, concrete headwalls, flared ends, grassed swales or properly formed catch drains. Rock is useful where flow is concentrated, but it needs to be sized and placed to suit the expected water velocity. A few loose small rocks often wash away in the first serious event.
Headwalls can provide a tidy, durable finish and help retain road fill at the pipe ends. They are particularly useful on higher fills or where the crossing is exposed to traffic and erosion. However, they need proper footing and drainage treatment. A poorly built headwall can crack or be undermined just as readily as an unprotected outlet.
Keep debris management in mind. Pipes beneath tracks through timbered country or areas with heavy vegetation can block with sticks, leaf litter and sediment. The inlet should be accessible for inspection and clearing without needing to dig into the driveway.
Choose materials for the job, not just the initial price
Concrete pipe, reinforced concrete box culverts and corrugated steel or plastic pipe all have their place on rural properties. The best option depends on load rating, expected flow, site access, corrosive soils, fire exposure, available cover and budget.
Concrete is commonly chosen for high-load crossings and long service life. It is heavy, which can mean more machinery and transport planning, but that weight also suits demanding access roads. Plastic pipe can be practical for certain drainage jobs because it is easier to handle, though it still requires correct bedding, compaction and cover. Steel products can suit appropriate applications but should be assessed for corrosion risk, particularly in wet or acidic ground.
For larger flows, multiple pipes are not always the answer. They can be harder to keep clear and may concentrate flow at the outlet. A larger single pipe or engineered box culvert may be the better long-term solution. The right decision comes from site conditions rather than a one-size-fits-all rule.
Inspect after rain and maintain the crossing
The first heavy rainfall is the real test. Inspect the inlet and outlet once flows have dropped to a safe level. Look for ponding above the crossing, blocked pipe ends, erosion around batters, sinkholes in the road surface, sediment build-up and water bypassing the culvert.
Clear debris before it becomes compacted, repair small scour early and keep table drains shaped. If a culvert repeatedly blocks or overtops, do not just add more gravel over the road. The issue may be inadequate capacity, poor alignment, restricted inlet flow or an outlet that has been damaged by erosion.
A properly installed culvert protects more than a driveway. It keeps stock and machinery moving, reduces damage to paddocks and fencing, and gives the whole property a safer, more reliable access route. For crossings carrying heavy vehicles, dealing with major runoff or requiring substantial excavation and road formation, engaging an experienced rural earthworks contractor is the practical way to get the levels, compaction and drainage right from the ground up.